Appearance
<font style="color:rgba(0, 0, 0, 0.88);background-color:rgb(246, 246, 246);">rsyncd</font>
rsync服务端流程
<font style="color:rgb(18, 6, 73);">rsyncd.conf</font> | |
rsyncd.conf - rsync服务端配置文件
bash
# rsyncd.conf - rsync服务配置文件
# created by oldboy 15:01 2009-6-5

## 全局配置

# 伪装成root权限,用于rsync读写数据时虚拟用户
fake super = yes

# 设置rsync服务使用的用户ID
uid = rsync

# 设置rsync服务使用的组ID
gid = rsync

# 禁用chroot,不将rsync限制在特定目录内
use chroot = no

# 最大连接数,限制同时连接的客户端数量
max connections = 2000

# 连接超时时间,单位为秒
timeout = 600

# 存放rsync服务的PID文件路径
pid file = /var/run/rsyncd.pid

# 进程/服务的锁文件,防止重复运行
lock file = /var/run/rsync.lock

# rsync服务端日志文件路径,用于记录rsync服务的运行信息
log file = /var/log/rsyncd.log

# 忽略错误,使rsync在遇到错误时不中断
ignore errors

# 可以进行读写操作,允许客户端上传和下载数据
read only = false

# 关闭rsync服务端列表功能,防止客户端列出服务端的目录结构
list = false

# 允许访问的IP或网段(白名单),注释掉表示不限制
# hosts allow = 10.0.0.0/24

# 拒绝访问的IP或网段(黑名单),注释掉表示不限制
# hosts deny = 0.0.0.0/32

# rsync服务端进行验证的用户名,不能存储在secrets file中
auth users = rsync_backup

# 用于验证的密码文件路径,包含用户名和密码
secrets file = /etc/rsync.passwd

## 局部(模块)配置

[data]
# 注释说明,用于描述模块的用途或相关信息
comment = www by old0boy 14:18 20
# 模块对应的目录路径,rsync将在此目录下进行数据同步
path = /backup/data

[video]
# 注释说明
comment = xxxx
# 模块对应的目录路径
path = /video/
shell
# 服务端执行
ping 10.0.0.31    # 测试与客户端的10网段连通性
ping 172.16.1.31  # 测试与客户端的172网段连通性
ping nfs01        # 测试主机名解析(需确保/etc/hosts已配置)
shell
# 服务端执行
rpm -qa | grep rsync  # 确认rsync已安装
#列出安装的 rsync 包中的所有文件,显示它们的路径
root@backup ~]# rpm -ql rsync
/etc/rsyncd.conf
/etc/sysconfig/rsyncd
<font style="color:rgba(0, 0, 0, 0.88);background-color:rgb(246, 246, 246);">/etc/rsyncd.conf</font>
shell
# /etc/rsyncd.conf
uid = rsync
gid = rsync
use chroot = no
max connections = 2000
timeout = 600
pid file = /var/run/rsyncd.pid
lock file = /var/run/rsync.lock
log file = /var/log/rsyncd.log
ignore errors
read only = false
list = false
auth users = rsync_backup
secrets file = /etc/rsync.password

[data]
comment = study
path = /data

#修改配置文件重启服务
systemctl restart rsyncd
shell
id rsync #检查用户
# 1. 创建rsync用户
useradd -M -s /sbin/nologin rsync

# 2. 创建密码文件并设置权限
#账号:密码
echo "rsync_backup:1" > / etc/rsync.password
chmod 600 /etc/rsync.password

# 3. 创建数据目录并授权,确保 rsync 服务能够正常访问和操作该目录
mkdir -p /data
chown -R rsync:rsync /data

# 4. 启动服务
systemctl enable --now rsyncd
systemctl restart rsyncd

# 5.服务端测试
rsync -avz /etc/hostname rsync_backup@172.16.1.41::data
客户端流程
shell
方案1 RSYNC_PASSWORD的环境变量
export RSYNC_PASSWORD=1
方案2
#客户端只需要密码,不需要用户
echo "1" > /etc/rsync.client
chmod 600 /etc/rsync.client
rsync -avz /etc/hostname rsync_backup@172.16.1.41::data --password-file=/etc/rsync.client
shell
``# 方式1:环境变量
export RSYNC_PASSWORD=1
rsync -avz /etc/hostname rsync_backup@172.16.1.41::data
# 方式2:密码文件
rsync -avz /etc/hostname rsync_backup@172.16.1.41::data --password-file=/etc/rsync.client**<font style="color:rgba(0, 0, 0, 0.88);background-color:rgb(246, 246, 246);">-a</font>**
- <font style="color:rgba(0, 0, 0, 0.88);background-color:rgb(246, 246, 246);">递归同步目录(若源是目录)</font>
- <font style="color:rgba(0, 0, 0, 0.88);background-color:rgb(246, 246, 246);">保留文件属性(权限、时间戳、属主等)</font>
- <font style="color:rgba(0, 0, 0, 0.88);background-color:rgb(246, 246, 246);">等效于</font><font style="color:rgba(0, 0, 0, 0.88);background-color:rgb(246, 246, 246);"> </font>`<font style="color:rgba(0, 0, 0, 0.88);background-color:rgb(246, 246, 246);">-rlptgoD</font>`
**<font style="color:rgba(0, 0, 0, 0.88);background-color:rgb(246, 246, 246);">-v</font>**
- <font style="color:rgba(0, 0, 0, 0.88);background-color:rgb(246, 246, 246);">显示同步过程中的详细信息(如传输的文件名、速度等)</font>
**<font style="color:rgba(0, 0, 0, 0.88);background-color:rgb(246, 246, 246);">-z</font>**
- <font style="color:rgba(0, 0, 0, 0.88);background-color:rgb(246, 246, 246);">启用压缩传输,减少网络带宽占用</font>
**<font style="color:rgba(0, 0, 0, 0.88);background-color:rgb(246, 246, 246);">rsync_backup</font>**<font style="color:rgba(0, 0, 0, 0.88);background-color:rgb(246, 246, 246);">/etc/rsyncd.conf</font>**<font style="color:rgba(0, 0, 0, 0.88);background-color:rgb(246, 246, 246);">172.16.1.41</font>****<font style="color:rgba(0, 0, 0, 0.88);background-color:rgb(246, 246, 246);">data</font>**<font style="color:rgba(0, 0, 0, 0.88);background-color:rgb(246, 246, 246);">/data</font><font style="color:rgba(0, 0, 0, 0.88);background-color:rgb(246, 246, 246);">/etc/rsyncd.conf</font><font style="color:rgba(0, 0, 0, 0.88);background-color:rgb(246, 246, 246);">[data]</font>
shell
#!/bin/bash
# /server/scripts/bak_conf.sh
bak=/backup
ip=$(hostname -I | awk '{print $1}')
time=$(date +%F_%w)
file_name="conf-${time}.tar.gz"

# 1. 备份配置文件
backup_files() {
    mkdir -p ${bak}/${ip}
    tar zcf ${bak}/${ip}/${file_name} /etc
    return $?
}

# 2. 传输到服务端
send_backup_files() {
    RSYNC_PASSWORD=1 rsync -avz ${bak} rsync_backup@172.16.1.41::data
    return $?
}

# 3. 清理旧备份
delete_files() {
    find ${bak} -type f -name "*.tar.gz" -mtime +7 | xargs rm -f
    return $?
}

# 主流程
main() {
    backup_files
    send_backup_files
    delete_files
}

main
plain
# 每天凌晨3点执行备份
echo "0 3 * * * /bin/bash /server/scripts/bak_conf.sh > /var/log/backup.log 2>&1" >> /etc/crontab

systemctl restart crond
plain
# 检查服务端日志
tail -f /var/log/rsyncd.log
检查网络连通性
ping 172.16.1.41
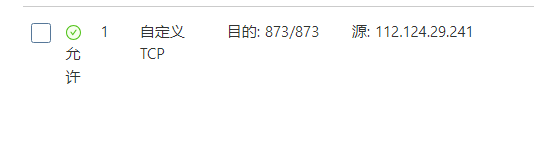
telnet 172.16.1.41 8734Rsync 异地容灾备份项目
- 项目架构图
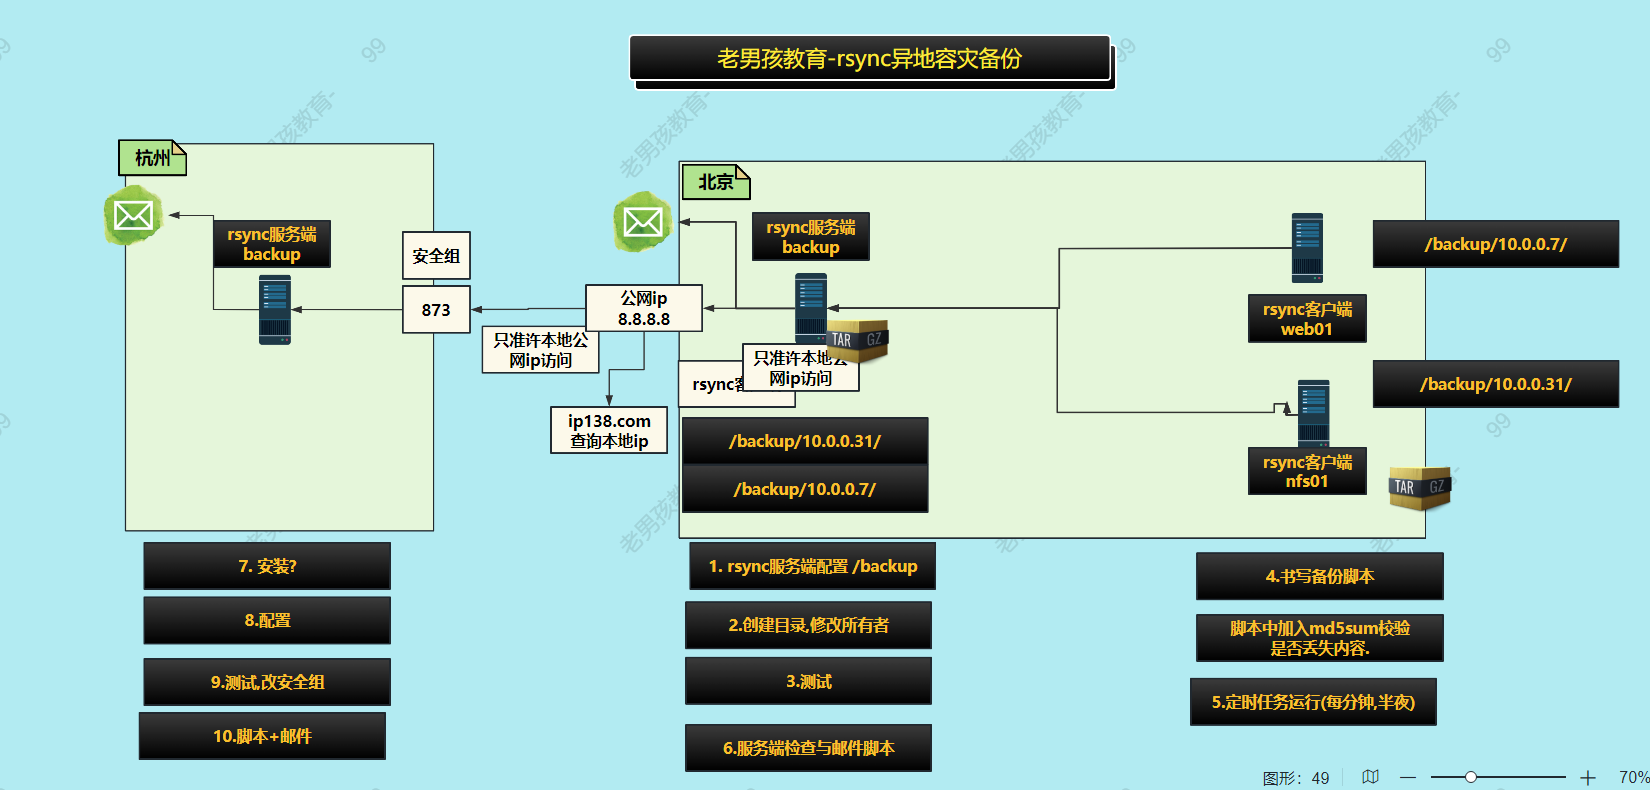
-- 项目准备流程
准备
- ``````
--- 详细流程
- ``
shell
[root@backup ~]# cat /etc/rsyncd.conf
#增加模块
[backup]
comment = Backup directory
path = /backup
#创建目录和配置权限
mkdir -p /backup/
chown -R rsync.reync /backup/

[root@backup ~]# ll -d  /backup/
drwxr-xr-x 7 rsync rsync 81 2月 26 19:17 /backup/- ``
shell
cat /server/scripts/bak_conf.sh
#!/bin/bash
# 变量定义
bak="/backup/"
ip=$(hostname -I | awk '{print $1}')
time=$(date +%F_%w)
file_name="conf-${time}.tar.gz"

# 打包配置文件
backup_files() {
    tar zcf ${bak}/${ip}/${file_name} /etc/
    return $?
}

# 生成MD5校验文件,验证数据传输是否缺失
create_md5() {
    md5sum ${bak}/${ip}/${file_name} > ${bak}/${ip}/check.md5
}

# 同步到本地服务端
send_backup_files() {
    RSYNC_PASSWORD=1 rsync -avz ${bak}/ rsync_backup@172.16.1.41::backup
    return $?
}

# 清理7天前的文件
delete_files() {
    find ${bak} -type f -name "*.tar.gz" -mtime +7 | xargs rm -f
}

# 主流程
main() {
    backup_files && create_md5 && send_backup_files && delete_files
}
main
#------------------------------------------------

#检查定时任务
[root@nfs01 ~]# crontab -l
#. sync time
*/3 * * * * /sbin/ntpdate ntp.aliyun.com  >/dev/null  2>&1
#每小时的 第 10 分钟 执行一次
10 * * * * bash /server/scripts/bak_conf.sh >/dev/null 2>&1

#检查脚本是否执行成功
[root@nfs01 ~]# tree -F /backup/
/backup/
├── 10.0.0.31/
│   ├── check.md5
│   └── conf-2025-03-23_0.tar.gz
└── ssh/
    ├── ssh_config.d/
    ├── ssh_config.rpmsave
    ├── sshd_config.rpmsave
shell
[root@backup ~]# yum -y install mailx

#backup
cat /etc/mail.rc
set bsdcompat
set -S DEAD=""
set from=1***@163.com
set smtp=smtp.163.com
set smtp-auth-user=1***@163.com
set smtp-auth-password=****
set smtp-auth=login

#邮箱发送脚本
[root@backup ~]# cat /server/scripts/backup_check.sh
#!/bin/bash
# Organization:www.linuxpath.cn
mail=you_number@qq.com

md5sum  -c /backup/*/check.md5  >/backup/result.txt

cat /backup/result.txt | mail -s "检查输出" $mail
#定时任务
crontab -e
#1. sync time
*/3 * * * * /sbin/ntpdate ntp.aliyun.com  >/dev/null  2>&1
* * * * * bash /server/scripts/backup_check.sh >/dev/null 2>&1- ``
- ``
- 配置文件
shell
##rsyncd.conf start##
fake super =yes
strict modes = no
uid = rsync
gid = rsync
use chroot = no
max connections = 2000
timeout = 600
pid file = /var/run/rsyncd.pid
lock file = /var/run/rsync.lock
log file = /var/log/rsyncd.log
ignore errors = yes
read only = false
list = false
#hosts allow = 10.0.0.0/24
#hosts deny = 0.0.0.0/32
auth users = rsync_backup
secrets file = /etc/rsync.password
#####################################

[backup]
comment = /backup/
path = /backup/
strict modes = no
#创建目录和配置权限
mkdir -p /backup/
chown -R rsync.reync /backup/

[root@backup ~]# ll -d  /backup/
drwxr-xr-x 7 rsync rsync 81  2月 26 19:17 /backup/

#  创建rsync用户
useradd -M -s /sbin/nologin rsync

# 创建密码文件并设置权限
#账号:密码  公有云密码设置复杂一点
echo "rsync_backup:1" > / etc/rsync.password
chmod 600 /etc/rsync.password

#  创建数据目录并授权,确保 rsync 服务能够正常访问和操作该目录
mkdir -p /backup
chown -R rsync:rsync /backup
#重启rsync
systemctl enable --now rsyncd
root@ubtwjh:~# systemctl status  rsync
#rsync测试
rsync -avz /etc/hostname rsync_backup@公网IP:backup
#测试  本地Rsync客户端即backup机器
- <font style="color:rgb(6, 7, 31);background-color:rgb(253, 253, 254);">编写检查脚本,验证异地备份文件的完整性,并通过邮件发送通知。</font>
shell
#安装邮件
root@ubtwjh:~# apt -y install s-nail

公有云屏蔽了25端口,使用465端口发送即可
set from=xxx@163.com
set smtp=smtps://smtp.163.com:465    #注意这里的变化
set smtp-auth-user=xxx6@163.com
set smtp-auth-password=xxxxx
set smtp-auth=login
set ssl-verify=ignore
set nss-config-dir=/etc/pki/nssdb/
#连接163服务器需要的证书文件(因为访问465)并保存到/etc/pki/nssdb/
echo -n "" | openssl s_client -connect smtp.163.com:465 | sed -ne '/-BEGIN CERTIFICATE-/,/-END CERTIFICATE-/p' >/etc/pki/nssdb/163.crt


#书写脚本
#!/bin/bash
# Author: Your Name
# Description: Check the integrity of remote backup files and send email notification

# 邮件接收地址
MAIL_ADDRESS="you_number@qq.com"

# 备份文件目录
BACKUP_DIR="/backup"

# 备份文件的 MD5 校验和文件
MD5_FILE="$BACKUP_DIR/check.md5"

# 校验和结果输出文件
RESULT_FILE="$BACKUP_DIR/result.txt"

# 检查 MD5 校验
echo "开始检查备份文件完整性..." > $RESULT_FILE
md5sum -c $MD5_FILE >> $RESULT_FILE 2>&1

# 检查 MD5 校验是否成功
if grep -q "FAILED" $RESULT_FILE; then
    # 如果有校验失败的文件,发送邮件通知
    SUBJECT="备份文件完整性检查失败"
    MESSAGE="备份文件完整性检查失败,请检查详细日志。\n\n$(cat $RESULT_FILE)"
else
    # 如果没有校验失败,发送成功的邮件通知
    SUBJECT="备份文件完整性检查成功"
    MESSAGE="备份文件完整性检查成功,所有文件均完整无误。\n\n$(cat $RESULT_FILE)"
fi

# 发送邮件通知
echo -e "$MESSAGE" | mail -s "$SUBJECT" $MAIL_ADDRESS

# 提示脚本执行完毕
echo "检查结果已发送至 $MAIL_ADDRESS"