Appearance
Nginx 1.26 环境准备
配置yum源(以CentOS 7为例)
bash
# 配置nginx yum源
vim /etc/yum.repos.d/ngx.repo
[nginx-stable]
name=nginx stable repo
baseurl=http://nginx.org/packages/centos/$releasever/$basearch/
gpgcheck=1
enabled=1
gpgkey=https://nginx.org/keys/nginx_signing.key
module_hotfixes=true

# 安装nginx
yum install -y nginx

# 检查端口是否被占用
ss -lntup | grep 80

# 启动nginx
systemctl start nginx

# 设置nginx开机自启
systemctl enable nginx
Ngx 配置文件详解
| 主配置文件 | /etc/nginx/nginx.conf | 避免文件内容过多,全局核心 |
|---|---|---|
| 子配置文件 | /etc/nginx/conf.d/xxcx.conf | 站点信息写道子配置文件 |
主配置文件内容(/etc/nginx/nginx.conf)
nginx
# 指定nginx运行的用户和组,通常设置为nginx或www-data等
user nginx;

# 设置worker进程的数量,auto表示根据CPU核心数自动调整
worker_processes auto;

# 指定错误日志的路径和级别,这里设置为notice级别
error_log /var/log/nginx/error.log notice;

# 指定nginx进程ID文件的路径
pid /var/run/nginx.pid;
# events块用于定义影响nginx与客户端或服务器交互的全局参数
events {
# 每个worker进程的最大连接数,包括与客户端的连接和反向代理服务器的连接
    worker_connections 1024;
}
#用于处理HTTP和HTTPS请求
http {
    include /etc/nginx/mime.types;
    default_type application/octet-stream;
 #定义日志格式,这里定义了一个名为main的日志格式
    log_format main '$remote_addr - $remote_user [$time_local] "$request" '
                    '$status $body_bytes_sent "$http_referer" '
                    '"$http_user_agent" "$http_x_forwarded_for"';
  # 指定访问日志的路径和使用的日志格式
    access_log /var/log/nginx/access.log main;

    sendfile on;
    #tcp_nopush on;
  # 设置长连接的超时时间,单位是秒
    keepalive_timeout 65;
    #gzip on;
    # 包含子配置文件,这些文件通常位于/etc/nginx/conf.d/目录下
    # 可以在这些文件中定义具体的server块来处理不同的请求
    include /etc/nginx/conf.d/*.conf;
}- 主配置文件核心区域:用户、错误日志、events区域(连接数)、http区域(处理http/https请求)、访问日志。
子配置文件示例(/etc/nginx/conf.d/xxcx.conf)
nginx
# 定义一个server块,用于处理特定的域名和端口的请求
server {
    # 监听80端口,这是HTTP的默认端口
    listen 80;

    # 指定服务器名称,即用于匹配请求的域名
    # 当请求的Host头与server_name匹配时,nginx会使用这个server块来处理请求
    server_name bird.oldboylinux.cn;

    # 指定根目录,所有请求的文件都会从这个目录中查找
    # 如果请求的是目录,则会在这个目录下查找index文件
    root /app/code/bird/;

    # 定义location块,用于匹配特定的请求路径
    # 这里的/表示匹配所有请求路径
    location / {
        # 指定默认的索引文件,当请求的是目录时返回这个文件
        # 比如请求http://bird.oldboylinux.cn/时,会返回/app/code/bird/index.html
        index index.html;
    }
}- server区域:包含listen(端口)、server_name(域名)、root(指定站点目录)、location(处理请求)等指令。
部署 birdfly & game 站点
示例:部署bird站点和小霸王游戏站点
- bird站点配置:
nginx
server {
    listen 80;
    server_name bird.oldboylinux.cn;
    root /app/code/bird/;

    location / {
        index index.html;
    }
}- 小霸王游戏站点配置:
nginx
server {
    listen 80;
    server_name game.oldboylinux.cn;
    root /app/code/game/;

    location / {
        index index.html;
    }
}- 步骤:
- 创建站点目录。
- 解压代码到对应目录。
- 修改hosts文件或进行DNS解析。
- 浏览器访问。
故障排查
- 常用工具:ping、telnet、curl、wget、F12开发者工具。
- 详细排查步骤:参考故障排查文档。
Ngx 日志
错误日志
- 配置:
| 配置指令 | 说明 | 放置位置 | 格式 |
|---|---|---|---|
| error_log错误日志 | 配置错误日志相关信息 | main, server, location | error_log 文件 级别; |
比如error_log /var/log/nginx/error.log notice;
- 级别:详细程度依次递减 debug、info、notice、warn、error、crit、alert、emerg。
- 推荐级别:notice。
访问日志
nginx
http {
....
 #定义日志格式,这里定义了一个名为main的日志格式
    log_format main '$remote_addr - $remote_user [$time_local] "$request" '
                    '$status $body_bytes_sent "$http_referer" '
                    '"$http_user_agent" "$http_x_forwarded_for"';
......
}- 配置格式:使用
log_format指令定义。 - 常用变量:
$remote_addr:客户端IP地址。$remote_user:nginx认证的用户(默认为空)。$time_local:访问时间。$request:请求起始行(请求方法、URI、版本)。$status:HTTP状态码。$body_bytes_sent:请求资源的大小(流量)。$http_referer:引用页面。$http_user_agent:用户代理。$http_x_forwarded_for:X-Forwarded-For头信息。
举个例子
nginx
root@aliyun:~# cat /var/log/nginx/access.log

43.167.239.66 - - [05/Apr/2025:17:01:46 +0800] "GET / HTTP/1.1" 200 1853 "-" "Mozilla/5.0 (iPhone; CPU iPhone OS 13_2_3 like Mac OS X) AppleWebKit/605.1.15 (KHTML, like Gecko) Version/13.0.3 Mobile/15E148 Safari/604.1" "-"
43.167.239.66          # $remote_addr: 客户端 IP 地址,即发起请求的设备的 IP
- -                     # 身份验证标识(通常为 "-" 表示未提供或未启用身份验证)和授权用户标识(同样为 "-" 表示未提供)
[05/Apr/2025:17:01:46 +0800]  # $time_local: 请求的时间戳,格式为 [日/月/年:时:分:秒 时区],这里表示 2025 年 4 月 5 日 17 点 01 分 46 秒,时区为东八区(北京时间)
"GET / HTTP/1.1"       # $request: 请求方法和请求的路径及协议版本,这里表示使用 GET 方法请求根路径(/),协议版本为 HTTP/1.1
200                     # $status: 响应状态码,200 表示请求成功
1853                    # $body_bytes_sent: 响应体的大小(以字节为单位),这里表示返回的网页内容大小为 1853 字节
"-"                     # $http_referer: 引用站点(Referer),"-" 表示没有引用站点,即请求不是从其他网页链接跳转过来的
"Mozilla/5.0 (iPhone; CPU iPhone OS 13_2_3 like Mac OS X) AppleWebKit/605.1.15 (KHTML, like Gecko) Version/13.0.3 Mobile/15E148 Safari/604.1"  # $http_user_agent: 用户代理(User-Agent),用于标识发起请求的客户端软件信息,这里表示请求来自一台运行 iOS 13.2.3 的 iPhone 设备,使用 Safari 浏览器
"-"                     # $http_x_forwarded_for: 其他信息(通常为 "-" 表示没有额外信息),在一些日志配置中可能用于记录其他自定义字段
Location 规则
nginx
# 默认规则,其他location规则都失败了,这个保底
location / {
index index.html index.htm;
expires 1d; # 静态资源缓存1天
expires 1h; # API响应缓存1小时
}
# 精确匹配
location = /test {
...
}
# 路径匹配 匹配对应URI为www.lizi.com/linuxpath/以及递归后面的内容
location /linuxpath/ {
...
}
# 正则匹配(区分大小写)
location ~ \.(gif|jpg|png)$ {
...
}
# 正则匹配(不区分大小写)
location ~* \.(gif|jpg|png)$ {
...
}
# 优先级高的非正则匹配
location ^~ /images/ {
...
}
# 命名的location,用于内部跳转
location @fallback {
...
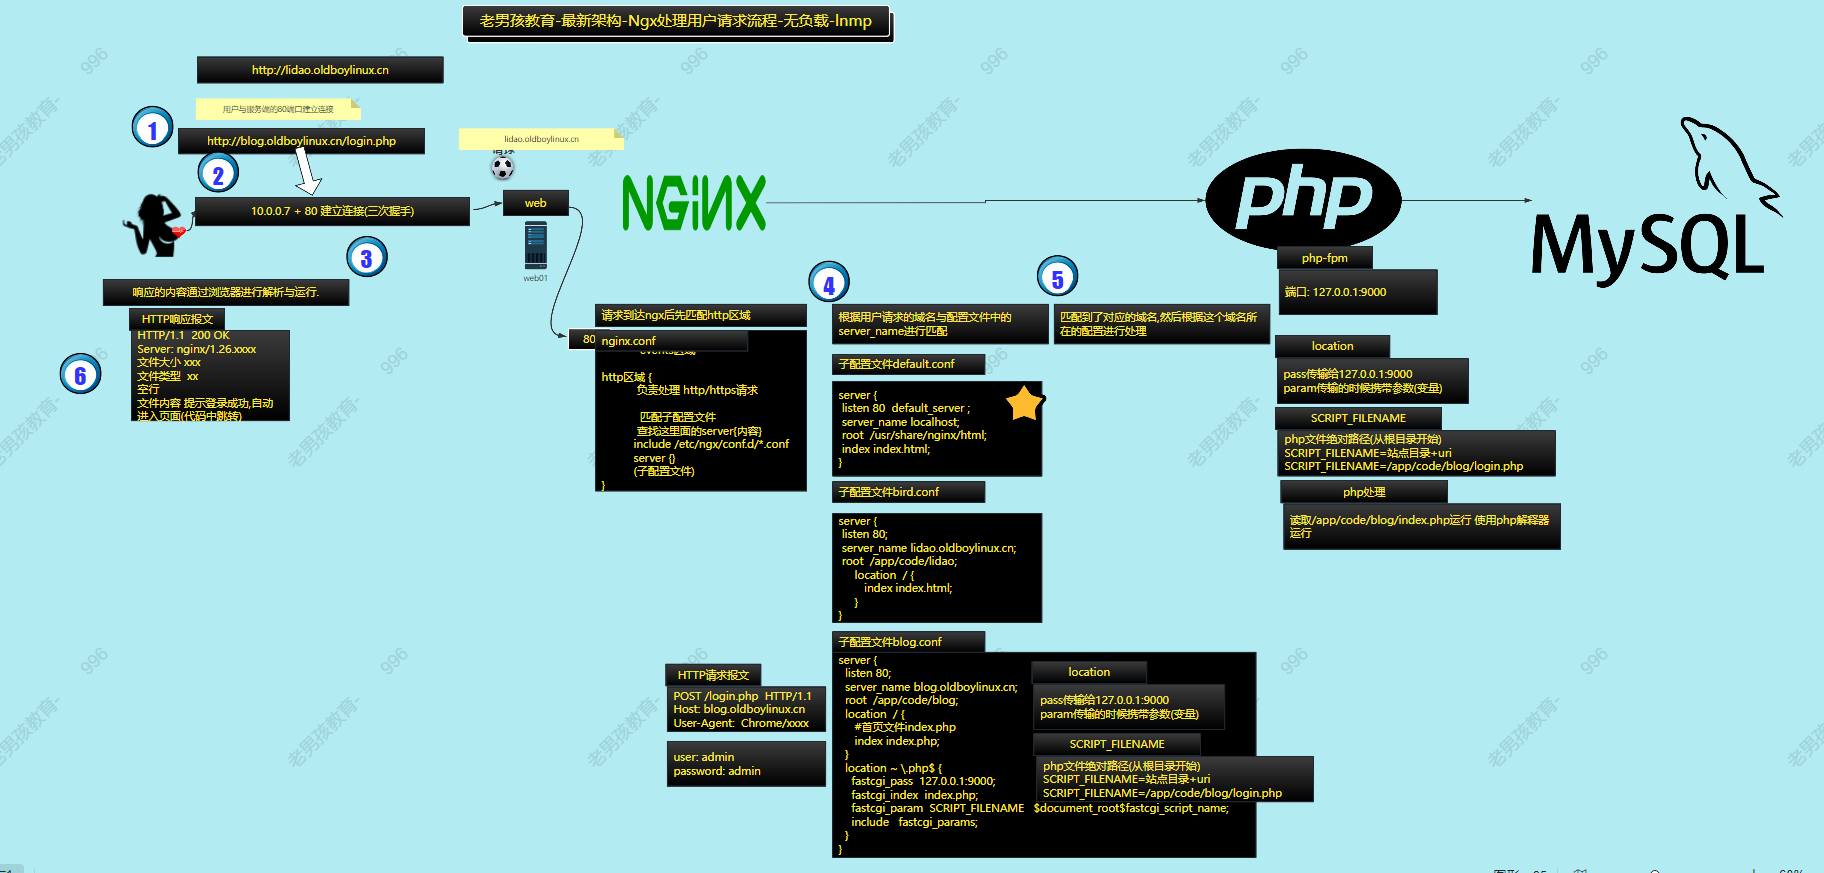
}动态网站常见架构
动态与静态
- 动态资源:服务端处理与加工,涉及动态语言如PHP、Java、Python等,一般需要数据库支持。
- 静态资源:服务端发送,客户端解析,如HTML、CSS、JS等。
常见动态网站架构
- LNMP:Linux系统、Nginx(web服务)、MySQL(数据库)、PHP环境。
- LNMT:Linux系统、Nginx(web服务)、MySQL(数据库)、Tomcat(Java)。
- 其他组合:如LNMP中的PHP可以替换为Python、Golang等其他动态语言。
LNMP+存储并备份 项目架构
项目背景
- 问题描述:当前Web服务器只有1台,连接独立的数据库服务器。随着用户量的不断增加,单台Web服务器已经无法承受压力,需要进行扩容。
- 解决方案:
- 水平扩容:增加Web服务器数量,分散请求压力。
- 垂直扩容:提升单台Web服务器的配置,但成本较高且效果有限。
- 拆分存储:将用户上传的内容拆分到独立的存储服务器(如NFS服务器),减轻Web服务器的存储压力。
- 实时同步:对存储服务器进行实时同步,确保数据备份和容灾。
架构图
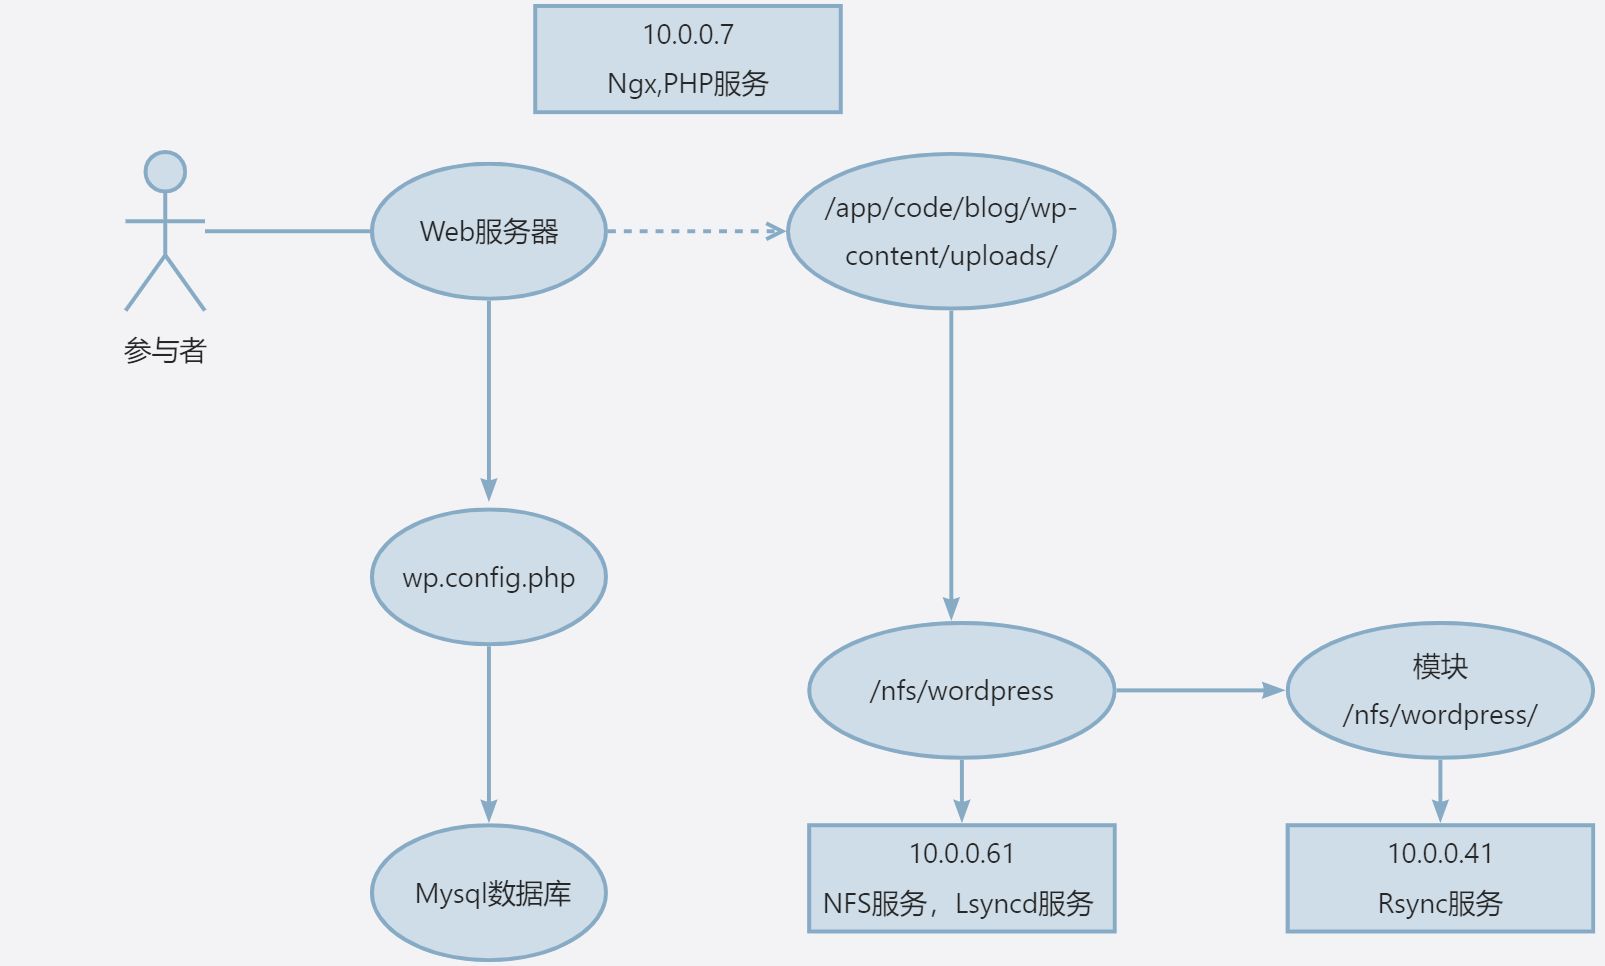
环境准备
| 角色 | 解析 | IP |
|---|---|---|
| Ngx+PHP | web01 | 10.0.0.7 |
| 数据库 | db01 | 10.0.0.51 |
| rsync | backup | 10.0.0.41 |
| nfs | nfs01 | 10.0.0.61 |
- `<font style="color:rgb(6, 7, 31);background-color:rgb(253, 253, 254);">Nginx</font>`<font style="color:rgb(6, 7, 31);background-color:rgb(253, 253, 254);">:一般选择稳定版本,如</font>`<font style="color:rgb(6, 7, 31);background-color:rgb(253, 253, 254);">1.26.xx</font>`<font style="color:rgb(6, 7, 31);background-color:rgb(253, 253, 254);">。</font>
- `<font style="color:rgb(6, 7, 31);background-color:rgb(253, 253, 254);">PHP</font>`<font style="color:rgb(6, 7, 31);background-color:rgb(253, 253, 254);">:根据代码要求选择版本,如</font>`<font style="color:rgb(6, 7, 31);background-color:rgb(253, 253, 254);">7.2</font>`<font style="color:rgb(6, 7, 31);background-color:rgb(253, 253, 254);">或</font>`<font style="color:rgb(6, 7, 31);background-color:rgb(253, 253, 254);">7.4</font>`<font style="color:rgb(6, 7, 31);background-color:rgb(253, 253, 254);">。</font>
- `<font style="color:rgb(6, 7, 31);background-color:rgb(253, 253, 254);">数据库</font>`<font style="color:rgb(6, 7, 31);background-color:rgb(253, 253, 254);">:根据代码要求选择</font>`<font style="color:rgb(6, 7, 31);background-color:rgb(253, 253, 254);">MySQL</font>`<font style="color:rgb(6, 7, 31);background-color:rgb(253, 253, 254);">或</font>`<font style="color:rgb(6, 7, 31);background-color:rgb(253, 253, 254);">MariaDB</font>`<font style="color:rgb(6, 7, 31);background-color:rgb(253, 253, 254);">及其版本。</font>
实施流程
1) 数据库部署
安装MariaDB:
bash
# 安装MariaDB服务器和客户端
yum install -y mariadb-server

# 启动并设置开机自启
systemctl enable mariadb
systemctl start mariadb

# 检查MariaDB是否安装成功
ss -lntup | grep mysql
ps -ef | grep mysql

# 设置数据库安全(首次运行)
mysql_secure_installation
#具体
按回车键确认设置密码。
输入y并按回车键,确认修改数据库的root密码。
设置MariaDB密码并按回车键,默认不显示输入密码。
再次输入新密码并按回车键,确认设置该密码。
说明
请输入符合密码验证策略强度的密码。
输入y并按回车键,移除匿名用户。
输入y并按回车键,禁止root账号远程登录。
输入y并按回车键,删除test库及对test库的访问权限。
输入y并按回车键,重新加载授权表- 数据库操作:
- 查看数据库:
show databases; - 创建数据库:
create database wordpress; - 删除数据库:
drop database wordpress;
- 查看数据库:
添加用户并设置权限:
sql
# 添加用户wp,并允许从172.16.1.0/24网段登录
create user 'wp'@'172.16.1.%' identified by 'password';

grant all on wordpress.* to 'wp'@'172.16.1.%';

flush privileges;
2) Web服务器安装PHP
- 安装PHP 7.2:
bash
# 清理已有的PHP软件包
systemctl stop php-fpm
yum -y remove php*

# 安装PHP 7.2及其相关软件包
yum -y install php php-bcmath php-cli php-common php-devel php-embedded php-fpm php-gd php-intl php-mbstring php-mysqlnd php-opcache php-pdo php-process php-xml php-json

# 启动并设置开机自启
systemctl enable php-fpm
systemctl start php-fpm

# 修改PHP-FPM配置文件,将进程用户改为nginx
sed -i 's/^user = apache/user = nginx/' /etc/php-fpm.d/www.conf
sed -i 's/^group = apache/group = nginx/' /etc/php-fpm.d/www.conf

# 检查语法并重启服务
php-fpm -t
systemctl restart php-fpm
Nginx配置
- 基本配置:
- 如果没安装 需要配置 yum nginx 源并安装
1.26
nginx
server {
    listen 80;
    server_name blog.oldboylinux.cn;
    root /app/code/blog;

    error_log /var/log/nginx/blog-error.log notice;
    access_log /var/log/nginx/blog-access.log main;

    location / {
        index index.html index.htm index.php;
    }

    location ~ \.php$ {
        fastcgi_pass 127.0.0.1:9000;
        fastcgi_index index.php;
        fastcgi_param SCRIPT_FILENAME $document_root$fastcgi_script_name;
        include fastcgi_params;
    }
}
4) 部署代码与设置权限
- 下载并解压WordPress:
- https://cn.wordpress.org/download/
bash
# 下载WordPress
wget https://cn.wordpress.org/download/

# 解压WordPress
tar -zxvf latest.tar.gz -C /app/code/blog

# 设置目录权限
chown -R nginx:nginx /app/code/blog
5)存储服务器配置NFS
- 创建共享目录:
bash
mkdir -p /nfs/wordpress
chown www:www /nfs/wordpress
chmod 755 /nfs/wordpress- 启动NFS服务:
bash
systemctl start nfs-server
systemctl enable nfs-server- 配置导出目录:
编辑/etc/exports文件,添加如下内容:
bash
/nfs/wordpress 172.16.1.0/24(rw,all_squash,anonuid=1999,anongid=1999)6) Web服务器准备挂载目录
修改Nginx和PHP-FPM运行用户
编辑/etc/php-fpm.d/www.conf和/etc/nginx/nginx.conf文件,将用户修改为www:
nginx
#配置nfs(用户www用户)  nfs,nginx,php统一使用www
[root@nfs01 ~]# id www
用户id=1999(www) 组id=1999(www) 组=1999(www)

[root@web01 /app/code/blog/wp-content]# egrep '^user|^group' /etc/phpfpm.d/www.conf
 user = www
 group = www
 [root@web01 /app/code/blog/wp-content]# egrep '^user|^group' /etc/nginx/nginx.conf
user  www;
 [root@web01 /app/code/blog/wp-content]# nginx -t
nginx: the configuration file
/etc/nginx/nginx.conf syntax is ok
[root@web01 /app/code/blog/wp-content]# php-fpm  -t
[03-Mar-2025 09:24:10] NOTICE:
configuration file /etc/php-fpm.conf test
is successful
 [root@web01 /app/code/blog/wp-content]# systemctl reload nginx  php-fpm
创建挂载点并挂载NFS共享目录:
bash
mkdir -p /app/code/blog/wp-content/uploads
mount -t nfs nfs01:/nfs/wordpress /app/code/blog/wp-content/uploads
- 注释:
* `/app/code/blog/wp-content/uploads`:Web服务器上的挂载点。
* `nfs01:/nfs/wordpress`:NFS服务器的共享目录。
迁移原有上传目录内容(假设原上传目录为/backup/uploads):
bash
mv /backup/uploads/* /app/code/blog/wp-content/uploads/7) 实时同步 Rsync 设置
配置rsync服务:
编辑rsyncd配置文件(如/etc/rsyncd.conf),添加如下内容:
plain
[wordpress]
path = /nfs/wordpress
comment = NFS Shared Directory for WordPress
- 注释:
* `[wordpress]`:模块名称。
* `path`:要同步的目录。
* `comment`:模块描述。
启动rsync服务:
bash
systemctl start rsyncd
systemctl enable rsyncd
8) 配置lsyncd服务:
编辑lsyncd配置文件(如/etc/lsyncd.conf),添加如下内容:
plain
settings {
    logfile = "/var/log/lsyncd.log",
    statusFile = "/var/log/lsyncd.status",
    inotifyMode = "CloseWrite",
    maxProcesses = 8,
}

sync {
    default.rsync,
    source = "/nfs/wordpress/",
    target = "rsyncuser@backupserver::wordpress",
    delay = 15,
    rsync = {
        binary = "/usr/bin/rsync",
        archive = true,
        compress = true,
        verbose = true,
        password_file = "/etc/lsyncd.rsync.password",
    }
}
创建密码文件:
bash
echo "1" > /etc/lsyncd.rsync.password
chmod 600 /etc/lsyncd.rsync.password
启动lsyncd服务:
bash
systemctl start lsyncd
systemctl enable lsyncd
9)测 试
- 上传文件测试:
在Web服务器上上传文件到/app/code/blog/wp-content/uploads目录,检查NFS共享目录和备份目录是否同步。 - 访问测试:
通过浏览器访问WordPress站点,确保网站正常运行,上传的文件能够正确显示。
<font style="color:rgba(0, 0, 0, 0.88);background-color:rgb(246, 246, 246);">stub_status</font>
plain
server {
  listen 80;
  server_name localhost;
  location /status {
    allow 10.0.0.1;      # 允许特定IP访问
    deny all;           # 拒绝其他IP
    stub_status;        # 启用状态模块
  }
}
plain
Active connections: 3
server accepts handled requests
45 45 67
Reading: 0 Writing: 1 Waiting: 2
- **<font style="color:rgba(0, 0, 0, 0.88);background-color:rgb(246, 246, 246);">字段解释</font>**<font style="color:rgba(0, 0, 0, 0.88);background-color:rgb(246, 246, 246);">:</font>
* `<font style="color:rgba(0, 0, 0, 0.88);background-color:rgb(246, 246, 246);">Active connections</font>`<font style="color:rgba(0, 0, 0, 0.88);background-color:rgb(246, 246, 246);">:当前活跃连接数。</font>
* `<font style="color:rgba(0, 0, 0, 0.88);background-color:rgb(246, 246, 246);">Reading</font>`<font style="color:rgba(0, 0, 0, 0.88);background-color:rgb(246, 246, 246);">:正在读取请求头的连接数。</font>
* `<font style="color:rgba(0, 0, 0, 0.88);background-color:rgb(246, 246, 246);">Writing</font>`<font style="color:rgba(0, 0, 0, 0.88);background-color:rgb(246, 246, 246);">:正在发送响应的连接数。</font>
* `<font style="color:rgba(0, 0, 0, 0.88);background-color:rgb(246, 246, 246);">Waiting</font>`<font style="color:rgba(0, 0, 0, 0.88);background-color:rgb(246, 246, 246);">:空闲连接数。</font>
<font style="color:rgba(0, 0, 0, 0.88);background-color:rgb(246, 246, 246);">upstream_check</font>
plain
# 下载Tengine源码并编译
./configure --add-module=./modules/ngx_http_upstream_check_module
make && make install
plain
upstream lb_pools {
  server 10.0.0.7:80;
  server 10.0.0.8:80;
  check interval=3000 rise=2 fall=5 timeout=1000 type=http;  # 每3秒检查一次
  check_http_send "HEAD / HTTP/1.0\r\nHost: lb.oldboylinux.cn\r\n\r\n";  # 发送HEAD请求
  check_http_expect_alive http_2xx http_3xx;  # 2xx/3xx状态码视为存活
}
server {
  location /lb_status {
    check_status;  # 展示健康状态页面
    allow 10.0.0.1;
    deny all;
  }
}
plain
Nginx http upstream check status
Check upstream server number: 2
| Index | Upstream   | Status | Rise counts | Fall counts |
|-------|------------|--------|-------------|-------------|
| 0     | 10.0.0.7:80| up     | 5           | 0           |
| 1     | 10.0.0.8:80| down   | 0           | 3           |
plain
cp /usr/sbin/nginx /usr/sbin/nginx.oldplain
cp /path/to/new/nginx /usr/sbin/nginxplain
kill -USR2 $(cat /var/run/nginx.pid)  # 启动新进程,保留旧进程
ps -ef |grep nginx
kill  $(cat /var/run/nginx.pid.oldbin)   # 完全关闭旧进程
plain
yum install httpd-tools -y
htpasswd -c /etc/nginx/passwd user1  # 创建用户user1
plain
server {
  location / {
    auth_basic "Restricted Area";      # 认证提示语
    auth_basic_user_file /etc/nginx/passwd;  # 密码文件路径
  }
}
shell
server {
  set $maintenance 0;  # 0-正常,1-维护
  if ($maintenance = 1) {
    return 503;
  }
  error_page 503 @maintenance;
  location @maintenance {
    return 503 "Service is under maintenance";
  }
}
shell
server {
  if ($request_method !~ ^(GET|POST|HEAD)$) {
    return 405;  # 返回Method Not Allowed
  }
}
shell
location / {
  rewrite ^/product/(\d+)$ /product.php?id=$1 last;  # 将/product/123重写为/product.php?id=123
}
shell
http {
  log_format main '$remote_addr - $remote_user [$time_local] "$request" '
                  '$status $body_bytes_sent "$http_referer" '
                  '"$http_user_agent" "$http_x_forwarded_for"';
  access_log /var/log/nginx/access.log main buffer=32k flush=5s;
}
nginx
nginx复制代码


server_tokens off;  # 隐藏响应头中的Nginx版本信息
nginx
nginx复制代码


client_max_body_size 10m;  # 允许上传最大10MB文件
nginx
nginx复制代码


if ($http_user_agent ~* "spider|bot") {
    return 403;  # 拦截常见爬虫UA
}
nginx
http {
    limit_conn_zone $binary_remote_addr zone=conn_zone:10m;
    limit_req_zone $binary_remote_addr zone=req_zone:10m rate=1r/s;
}

server {
    limit_conn conn_zone 10;     # 单IP并发连接数限制
    limit_req zone=req_zone burst=5;  # 漏桶算法限流
}
nginx
location ~* \.(jpg|css|js)$ {
    expires 7d;  # 静态资源缓存7天
}
nginx
events {
    use epoll;  # Linux下高性能事件驱动模型
    worker_connections 102400;  # 单个工作进程最大连接数
}
nginx
gzip on;
gzip_min_length 1k;        # 超过1KB才压缩
gzip_types text/css application/json;  # 指定压缩类型

brotli on;                 # 更高效的Brotli压缩
brotli_types text/html application/xml;
nginx
proxy_cache_path /var/cache/nginx levels=1:2 keys_zone=my_cache:10m;

location / {
    proxy_pass http://backend;
    proxy_cache my_cache;
    proxy_cache_valid 200 302 10m;  # 缓存有效时间
}
nginx
set $maintenance_file /etc/nginx/maintenance.html;
if (-f $maintenance_file) {
    return 503;  # 存在维护页面则返回503
}
nginx
if ($request_method !~ ^(GET|POST|HEAD)$ ) {
    return 405;  # 仅允许GET/POST/HEAD方法
}
nginx
server {
    listen 80;
    server_name example.com;
    return 301 https://$host$request_uri;
}
nginx
if ($host != 'www.example.com' ) {
    rewrite ^(.*)$ https://www.example.com$1 permanent;
}
nginx
upstream backend {
    server 192.168.1.10:8080 weight=2;
    server 192.168.1.11:8080;
}

location / {
    proxy_pass http://backend;
    proxy_set_header Host $host;  # 传递原始Host头
}